
Useful Information - Hints and Tips
We have had three Woodmizer sawmills through the years, but our latest is the biggest, baddest orange sawmill they sell, a Wood Mizer Super LT-70 Wide, capable of easily sawing 1,000 bdft per hour (16,000 lbs of logs per hour), and can produce boards up to 34" wide, 16 feet long.
Working With Hardwood - If you've never worked with high grade hardwood, you'll be in for a treat. Unlike most soft woods which rip and tear when cut due to their fibrous and coarse structure, hardwood cuts cleanly and easily, resulting in much sharper corners, edges and slicker surfaces. The joints are tighter, stronger, and the entire piece of furniture is much sturdier. Hardwoods cut better because most tool geometry was designed for them. In contrast, when used with softwoods, modern power tools feel a little sloppy and leave a less than optimal finish. A whole different behavior out of the same tools depending on the type of wood being machined. Same thing with hand tools, the cuts are cleaner, sharper and more controlled in hardwoods.. If you can build something out of a softwood, and make it look good, the you'll have no trouble with hardwood, and in most cases it will be much easier to make the piece look better. Sounds counterintuitive, but it true. Give it a try, you'll like it.
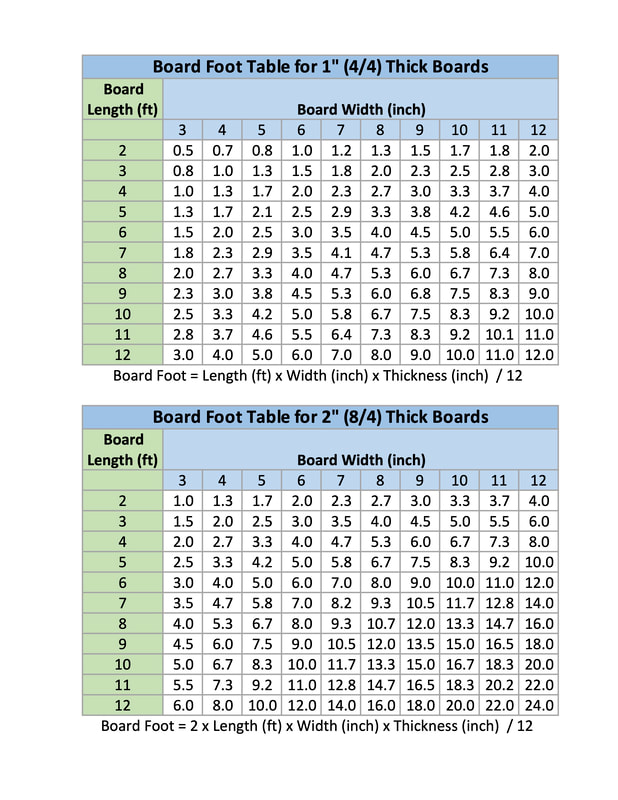
Board Foot Measurement - A board foot (BF or bdft) is the basic unit of measurement for hardwood lumber. A board foot (or bdft) is 1 foot long x 1 foot wide x 1 inch thick. Its one square foot of boards, one inch thick, or one half square foot of boards, two inches thick. The formula for determining board feet is: height in inches multiplied by the width in inches multiplied by the length in feet divided by 12. (Height * Width* Length) /12. It's easy to remember. You see most of the formula when you look at the sign in the lumber yard. It says 2" x 4" x 8' Just multiply all the numbers together and remember to divide by twelve and you have board feet for any board. Board footage is a nominal, volume measurement and meant for rough lumber. If a board is less than 1 inch thick, then it is still calculated with a thickness of 1 inch.
For example:
A standard 2x4-8 foot long is: 2 inch thick x 4 inch wide x 8 ft long /12 = 5.3 bdft
A board 12 inches wide 8 feet long and 1 inch thick is: 12 inch x 8 ft x 1 inch /12 = 8 bdft
A board 6 inches wide, 10 feet long and 1 inch thick is: 6 inch x 10 ft x 1 inch / 12 = 5 bdft
For example:
A standard 2x4-8 foot long is: 2 inch thick x 4 inch wide x 8 ft long /12 = 5.3 bdft
A board 12 inches wide 8 feet long and 1 inch thick is: 12 inch x 8 ft x 1 inch /12 = 8 bdft
A board 6 inches wide, 10 feet long and 1 inch thick is: 6 inch x 10 ft x 1 inch / 12 = 5 bdft
Why Do We Sell by the Board Foot? - The board foot scale is the standard measure for buying and selling logs and lumber in the wholesale wood industry. Its very easy to use, is applicable to both large and small quantities of lumber, and keeps both the seller and buyer on an even and fair basis. On the other hand in the consumer retail industry, most lumber is either sold by the individual piece or linear foot, however, these prices originate from the basic board foot cost. Unless you reverse the math while in the store, you won't be able to comparison shop with wholesalers or folks like us. For example, a price check of a big box retail store has a poplar board listed as 1"x6"x96" and sells for $21. When the board foot cost is calculated, it comes out to $5.25 per bdft. Another poplar board from the same store, with dimensions of 1"x2"x96" sells for $7.50 which comes out to $5.75 bdft. Lastly, a 1"x12"x48" poplar board sells for $21 which also comes out to $5.25 per board foot. So the poplar boards in this store all are being sold at approximately the same bdft cost, about $5.25 to $5.50.
By comparison, our poplar sells for about half that.
Lets look at red oak. In the big box store, a 1"x6"x8' costs $33.46. The actual dimensions for this board is 0.75" x 5.5" x 8' which is 2.75 bdft. $33.46/2.75 bdft = $12 per bdft!! That's what you are paying for red oak in a retail store, $12 per bdft! We charge less than half that, and our wood is much better anyway.
Estimating Quantity Using Board Foot
Its easy to estimate how much wood you'll need for a project when using the board foot method. For example, for a table top that is 4 feet long and 2 feet wide and 1 inch thick, it calculates out to 4' x 2' x 1" = 8 board feet. So multiply 8 bdft by the price of the wood species, and that's how much money it would cost.
Lumber Thickness Measurement
Sawmill lumber is measured and sawn in quarters on an inch. For example, 1 inch thick lumber is called 4/4 lumber (pronounced "four quarter" and means the lumber is four 1/4-inches thick. 5/4 would be five 1/4" increments, or 1.25", 6/4 would be 1.5", etc. The thickness is measured at the thinnest spot used to establish the grade of the board.
Since hardwoods are generally more valuable than softwoods, and in order to make sure that the board is never sawn too thin, a "Hardwood Quarter Scale" is used by the sawyer. The scale automatically adds 1/8" to the thickness of the hardwood board is being sawn. So a 4/4 hardwood oak board is really sawn to 4/4+1/8 inch while a 4/4 softwood pine board is sawn to only 4/4. One of he most common mistakes I see is that most sawyers, in order to save lumber, will saw hardwood using the softwood scale and end up sawing boards too thin too usable after they are dried and planed.
Since hardwoods are generally more valuable than softwoods, and in order to make sure that the board is never sawn too thin, a "Hardwood Quarter Scale" is used by the sawyer. The scale automatically adds 1/8" to the thickness of the hardwood board is being sawn. So a 4/4 hardwood oak board is really sawn to 4/4+1/8 inch while a 4/4 softwood pine board is sawn to only 4/4. One of he most common mistakes I see is that most sawyers, in order to save lumber, will saw hardwood using the softwood scale and end up sawing boards too thin too usable after they are dried and planed.
Air Drying Lumber
Air drying is the easiest and least expensive method used to remove water from fresh sawn lumber. A 2,000 pound fresh cut log may actually contain 50% weight water, or 1,000 pounds, that must be removed before it would be considered dry. Water weighs roughly 8.3 pounds per gallon, so this means that approximately 120 gallons of water must be removed from the single log. That's a lot of water!
Given enough time, an air drying stack of lumber will dry to the maximum extent that the outside environment will allow, typically about 15% EMC (Equilibrium Moisture Content) and is mainly affected by the humidity of the outside air. The rule of thumb is that it will take a year per inch thickness of lumber to air dry, but that is not always the case; it depends on many variables, such as relative humidity and the season of the year. Lumber dries much quicker in the summer than it does in the winter. Using accelerated air drying techniques, it's possible to get some species of lumber air dry in a matter of weeks.
The problem with air dried lumber is that most houses with modern air conditioning are very dry, and cause wood used inside to dry down to an EMC of 6%. So this means that no matter how long wood has been air dried, it is physically impossible for it to reach the extreme level of dryness required for lumber used inside a house. When air dried lumber at 15% EMC is brought into a house at 6% EMC, it will be forced to lose its moisture too quickly, and will usually crack and split.
Kiln Drying Lumber
Most people don't realize that although a kiln can remove moisture from lumber at a very high rate, its real function is to control the drying rate, and in some cases, actually slow it down to prevent wood from cracking. Every species of wood has a maximum acceptable drying rate to keep if from developing defects and loosing its value. For example, white oak must be dried very slowly, only removing about 1% of its internal moisture per day. Red oak can be dried at 2% moisture removal per day and poplar can be dried at 10% per day. So a white oak tree with about 50% moisture will take 50 days to dry safely, red oak can be dried in half the time or 25 days, while poplar can be dried in 5 days.
How Dry is Kiln Dried?
Kiln dried means that the moisture has been removed from the wood beyond what is possible by air drying, and is in a range that it would experience in a house or other structure with modern heat and air conditioning. For hardwood, it is generally accepted that once wood has been brought down to 6% - 8% moisture content it is kiln dried, and for framing material for houses, such as studs, it's only dried to about 15%, as required by the American Lumber Standard. Most people think kiln drying means drying the wood as much as possible, but really, the intent is to match what the boards experience indoors. If the wood has been dried too much, it will have excessive warp, and other defects.
Wood Grades
FAS or "Clear, Select"
FAS or "Clear, Select" grade, which derives from an original grade "First And Seconds", will provide the user with long, clear cuttings - best suited for high quality furniture, interior joinery and solid wood mouldings. Minimum board size is 6" and wider and 8' and longer. The FAS grade includes a range of boards that yield from 83% clear-wood cuttings over the entire surface of the board.
Number 1 Common (No. 1C) or "Cabinet Grade"
The Number 1 Common grade is often referred to as the Cabinet grade in the USA because of its adaptability to the standard sizes of kitchen cabinet doors used throughout the United States. Number 1 Common is widely used in the manufacture of furniture parts as well for this same reason. The Number 1 Common grades includes boards that are a minimum of 3" wide and 4' long and will yield clear face cuttings from 66 2⁄3% (8⁄12ths) up to, but not including, the minimum requirement for FAS (83 1⁄3%).
Number 2A Common (No. 2AC) or "Rustic"
The Number 2A Common grade is often referred to as the Economy grade because of its price and suitability for a wide range of furniture parts. It is also the grade of choice for the US hardwood flooring industry. The Number 2A Common grade includes boards that are a minimum of 3" wide and 4' long that yield from 50% (6⁄12ths) up to, but not including, the minimum requirement for Number 1 Common (66 2⁄3%).
Bugs
Bugs will find and attack your wood. It’s what they do, especially when it starts to warm up and they start moving around. Unprotected wood plus spring time equals bugs. Always. The kiln dried wood will be more resistant to attack because it is so dry, but any wood is vulnerable. Also, don't forget that most of the critters that eat wood fly to it, like small beetles, flying ants, and such, as opposed to termites which will attack from the ground up. All will make a run for your wood. Many of the little critters will lay their eggs in the wood in the spring and summer, then larvae will hatch and make almost invisible holes as the bore into the wood. Many months later they will emerge and leave holes in the wood.
If you have access to pesticides from the local farmers co-op, get the stuff labeled for termites and boring bugs, and hose the wood down as you stack it with a pump up sprayer and wand. You want the wood to be dripping wet and soak in and dry. Then put the stacks of treated wood on a layer of concrete blocks off the ground until you get to using it.
Timbor and Boracare are two very good commercial products used for this purpose. There is lots of information available on both products on the web. They use a very safe Borate powder that when mixed with water will create a long lasting barrier to boring insects. I also have used Roach Pruf or similar powder, which contains borate, mixed with water. I get my roach powder at the dollar store, so I mix it heavy and spray it on. It kills a lot of bugs besides roaches.
Why is Thick Wood Hard to Find?
Many people ask why its so hard to find very thick wood such as 3 or 4 inch thick. When kiln drying, every time the thickness is doubled, the defect rate, or the number or things that happen to the wood to make it undesirable, squares. In addition, the amount of time it takes to dry the wood also doubles. So 2 inch thick wood will have 4 times the drying defects, and 3 inch wood will have 9 times the drying defects. There is a tool to produce the thicker wood, it is called a vacuum kiln, and they start at about $100,000, a little out of reach for us. It is possible to air dry thick stock, but it also takes a very long time, the last load I did took 18 months.
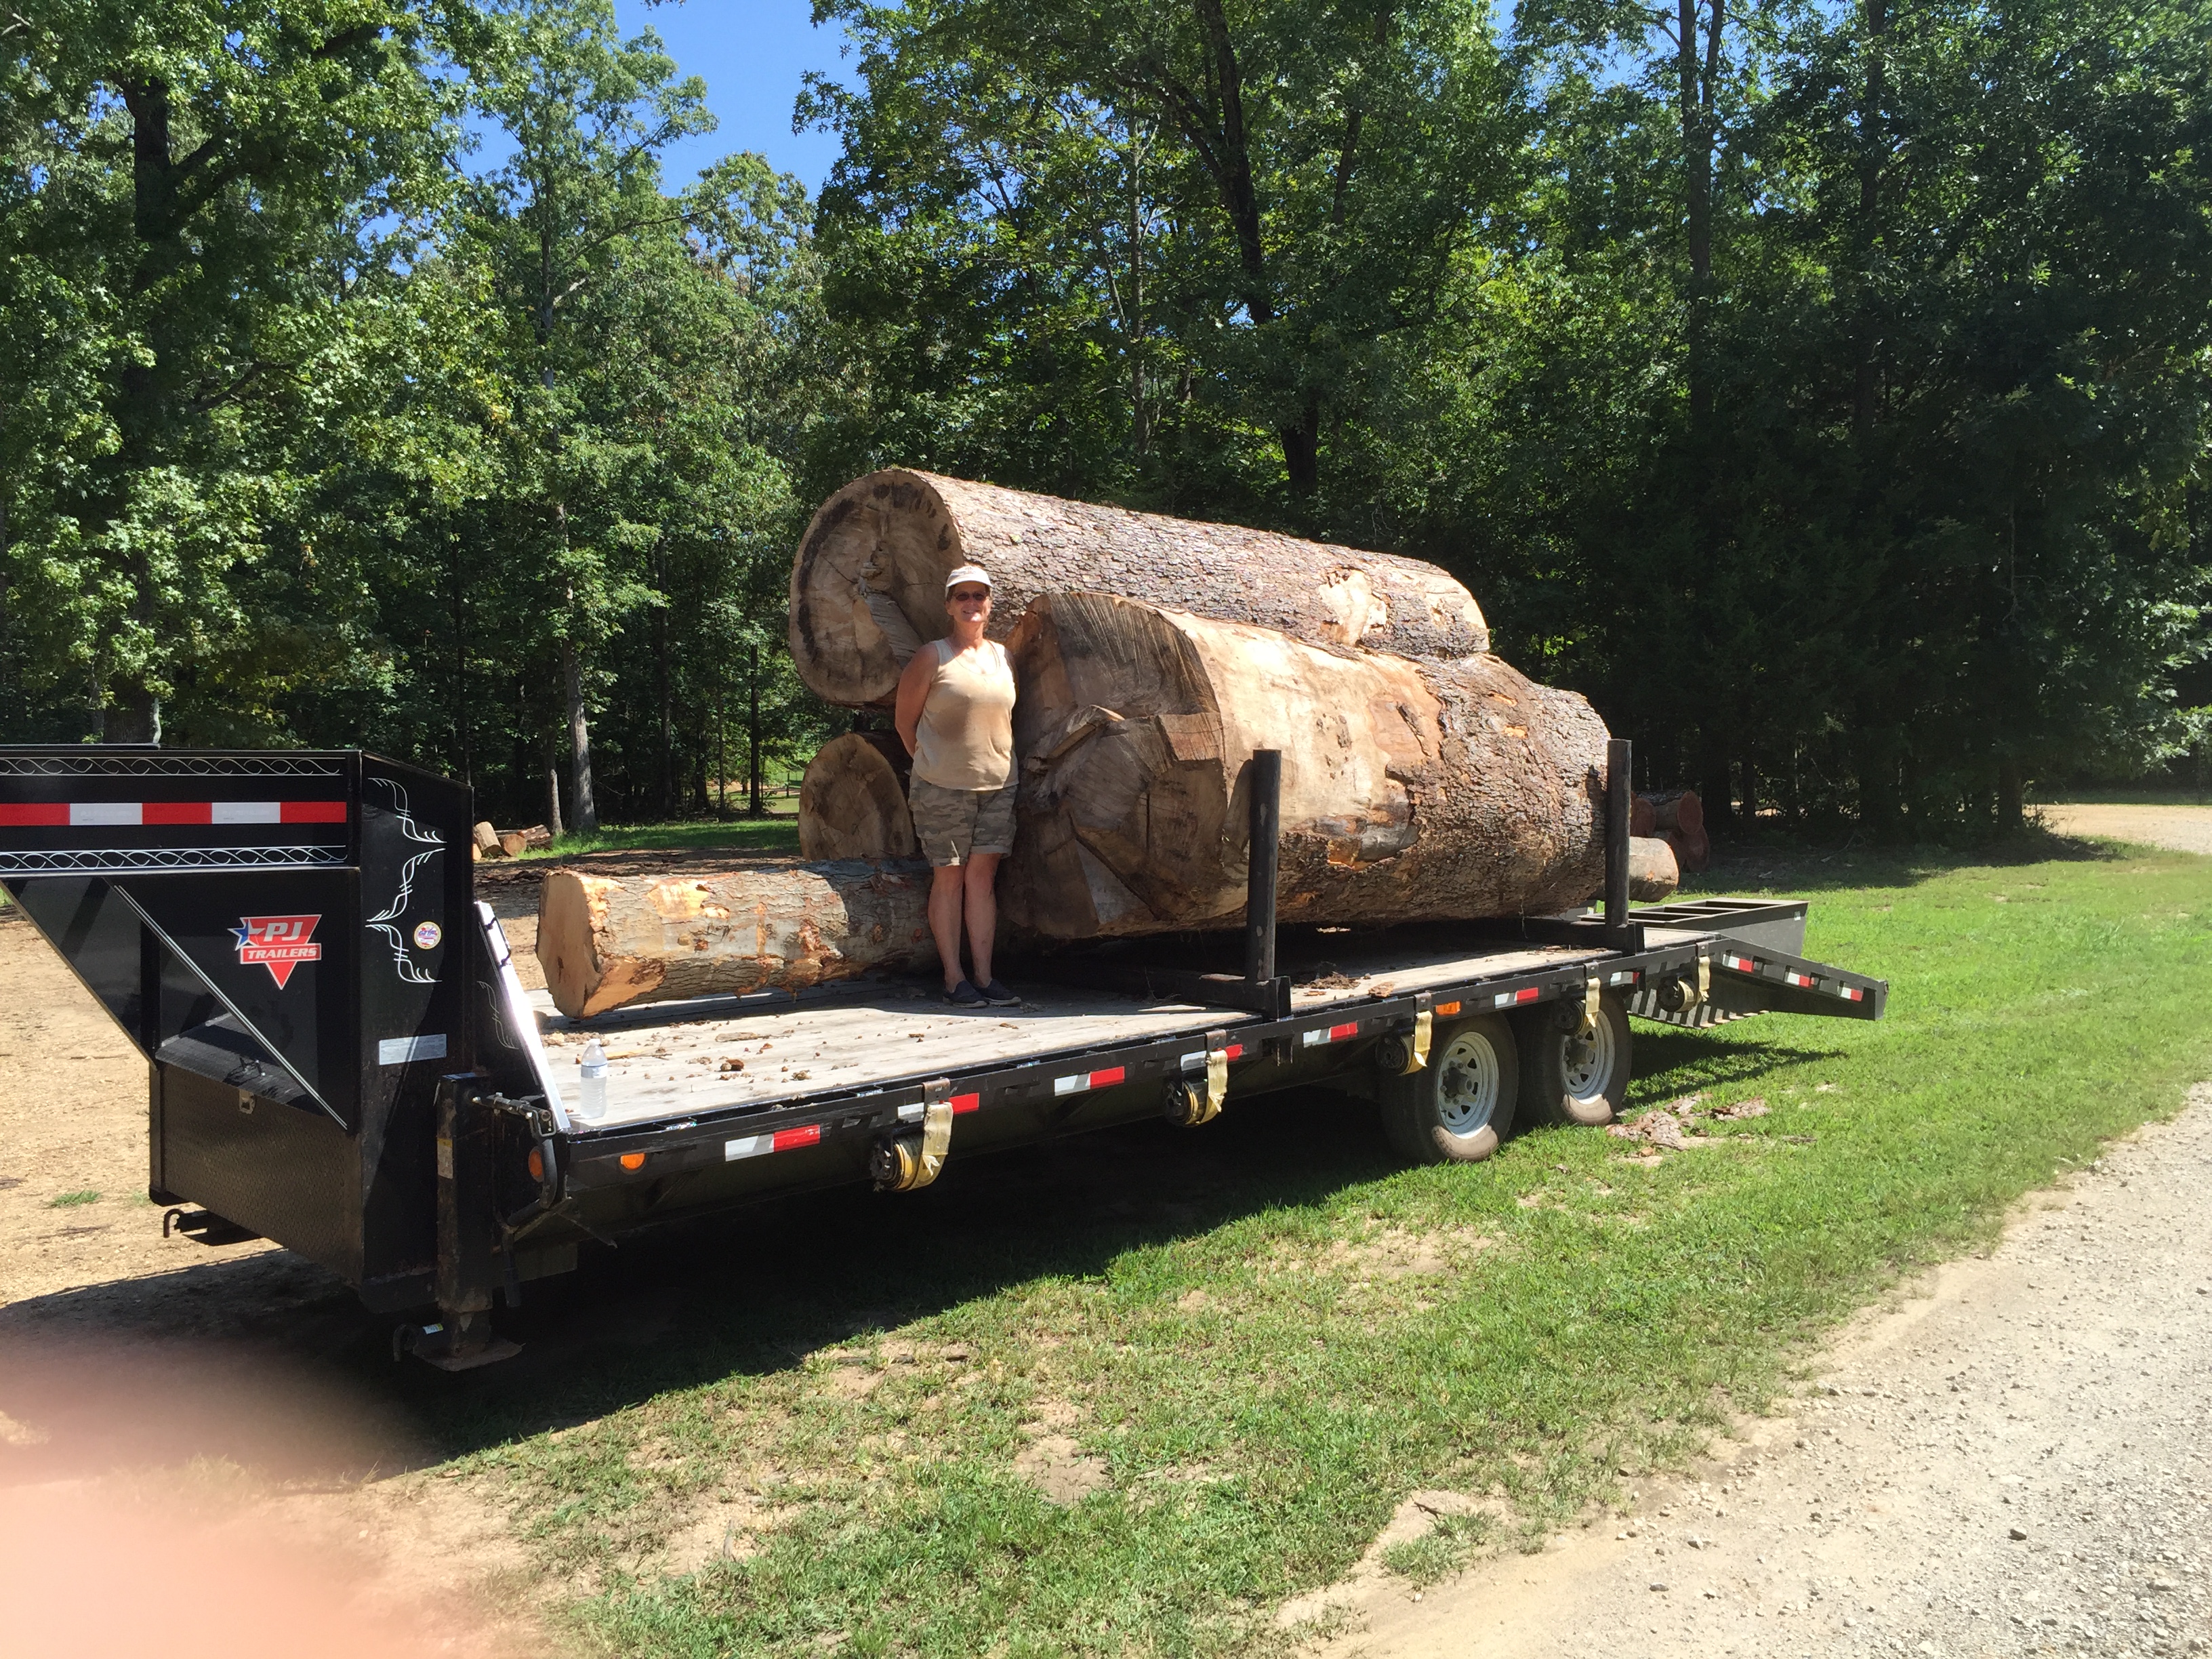
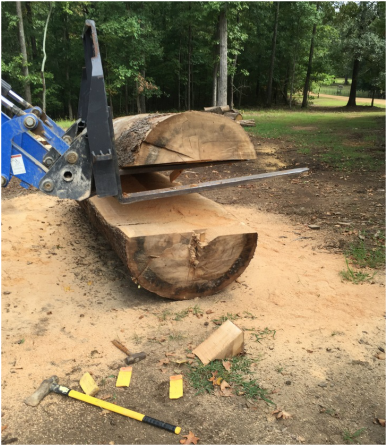
How big a log can we saw?
We can saw some big ones! We have the advantage over many mills in that we can be flexible, take our time, and do what it takes to get the big ones sawn up. First, we take one of our big chainsaws and rip the log down each side, which takes a little while. Then drive felling wedges into the cut and start forcing the log halves apart. Once I get them open a little, I drive the forks of the tractor into the cut and start snapping the log up and down until it finally gives up and splits into two halves. The halves go on the mill.
|
|
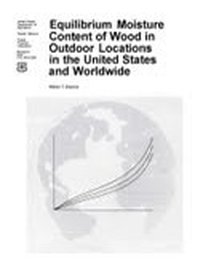
A common misconception and something we hear all the time is “My Lumber Has Been Air Drying for Years, So Its Got the be “Really” Dry.” However, it doesn’t matter how long the wood has been air drying, it can not get below the Equilibrium Moisture Content (EMC ) that the conditions allow. The Average yearly EMC of air dried wood in Huntsville is 13.7%, however drying wood in a warm barn or other area where the local relative humidity is lower (temperature is higher) will allow further drying. Kiln dried lumber stored outside will regain moisture eventually back to local EMC.